Turning the backlight off on the Raspberry PI 7″ touch screen

When I first setup Home Assistant here, I did so on a Raspberry PI 4B with a Phoscon RaspBee II ZigBee interface attached. It also has the official Raspberry PI 7″ touch screen, so it’s mounted high up on my Kitchen wall as that’s in a central location in the House.

Recently, as Home Assistant was under-performing, I rebuilt Home Assistant as a virtual machine within my ProxMox cluster, but the PI still manages the ZigBee connection via Zigbee2MQTT and a touch screen interface for HA – I also have several tablets wall mounted around the house doing the same thing.

However, as the PI is wall mounted it’s also powered via PoE and recently the PI’s started to report under-volt warnings as the PoE has started to provide less power than the PI needed.

So, as a temporary solution to this, until I can replace the power supply with either better PoE or a direct supply, the solution was to turn off the most power hungry device attached to the PI, which is the touch screen’s backlight.

So to turn off the backlight, simply run the following on the PI:

sudo sh -c 'echo "1" > /sys/class/backlight/rpi_backlight/bl_power'

This instantly turns off the backlight and, since I did this several days ago there’s been no under-volt warnings reported by the PI.

Note: Confusingly the 1 here turns the backlight off. Using 0 would turn it back on, the opposite to what you might expect.
Getting the Raspbery PI Official Touchscreen to work with RaspiOS Bookworm

Yesterday the latest RaspiOS was released based on Debian Bookworm. This is the version of the OS which will support the forthcoming PI5 but as before it supports every previous version of the PI.

There’s quite a few changes to this, mainly the use of Wayland as the main window manager & back-end rather than the venerable X11 which we have used for decades in the *nix world.

So today I upgraded one of my PI4’s to the new OS by flashing the SD card with the fresh image to see what’s changed and it does look pretty good.

Except, the PI I used was one of the few I have with the official Touchscreen’s attached.

When the PI booted bookworm for the first time all looked well. The display worked fine and it entered the initial configuration fine – except there was no touch. I had to attach a mouse to it so I could complete the process.

Now I had a similar issue before with Bullseye which I remembered was down to some changes within /boot/config.txt so I compared that with another of the touchscreens which I happen to run HomeAssistant on.

So Bookworm has this:

# Enable DRM VC4 V3D driver
dtoverlay=vc4-kms-v3d
max_framebuffers=2

But the working PI has those commented out, so I changed it to:

# Enable DRM VC4 V3D driver
#dtoverlay=vc4-kms-v3d
#max_framebuffers=2

Then rebooted and the PI just had a blank screen.

Fortunately I always enable SSH so logged in and ran sudo raspi-config

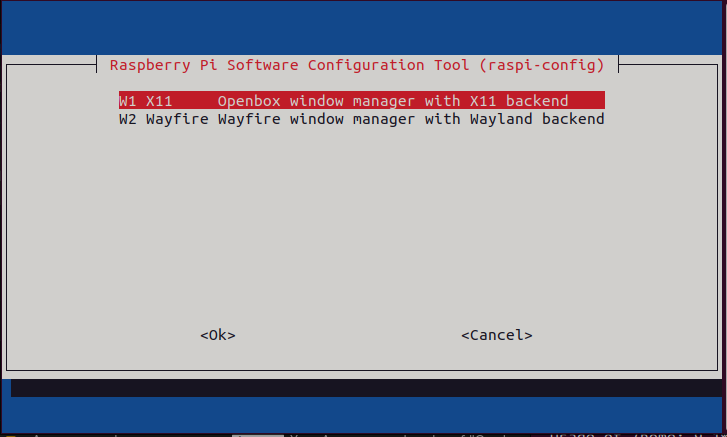
In there under 6 Advanced Options there’s A6 Wayland which now controls which backend to use for the desktop. In Bookworm it now defaults to Wayland on the PI4 & soon PI5, so I switched it to W1 X11.

The option to set to use X11 instead of Wayland

Rebooted and we now have a desktop, but also the touch screen now worked.

So, for now at least you cannot use Wayland with the Official touch screen.

As the same drivers are used for other touchscreen’s out there for the PI this could also affect other makes of screens as well – many of them use the same chipset as the official one.

WordPress joins the Fediverse

This is a short article just to see how well the new integration works, but on October 11 2023 WordPress announced that all blogs they host can now be followed by users of Mastodon and other Federated systems.

At first I thought they were going to limit this for just the Business tier (the one you can add plugins to) but they’ve made it available to all tiers.

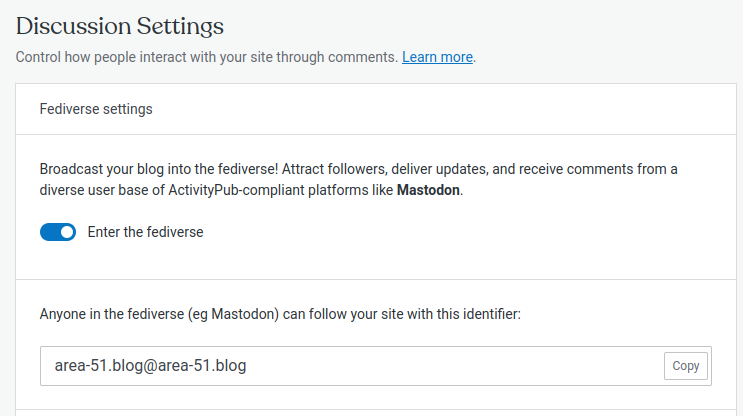
It’s not enabled by default but to enable all you need to do is go into Settings -> Discussion and you now see a new Fediverse settings section:

The new Fediverse settings block

Just enable the Enter the fediverse slider and you are given your blog’s address in the fediverse.

For me, in Mastodon I just entered the given address into the search box,
@area-51.blog@area-51.blog in my case and it showed up almost immediately. Click Follow and I was then following my blog.

Self hosting

I did check afterwards and for those who self-host WordPress the plugin is available at https://wordpress.org/plugins/activitypub/